您现在的位置是:网站首页> 编程资料编程资料
Keras搭建Mask R-CNN实例分割平台实现源码_python_
![]() 2023-05-26
613人已围观
2023-05-26
613人已围观
简介 Keras搭建Mask R-CNN实例分割平台实现源码_python_
什么是Mask R-CNN
来看看很厉害的Mask R-CNN实例分割的原理吧,还是挺有意思的呢!
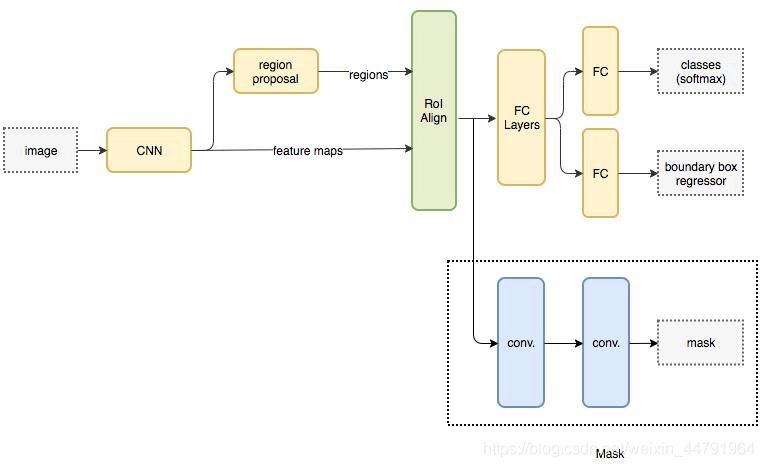
Mask R-CNN是He Kaiming大神2017年的力作,其在进行目标检测的同时进行实例分割,取得了出色的效果。
其网络的设计也比较简单,在Faster R-CNN基础上,在原本的两个分支上(分类+坐标回归)增加了一个分支进行语义分割,
Mask R-CNN实现思路
一、预测部分
1、主干网络介绍
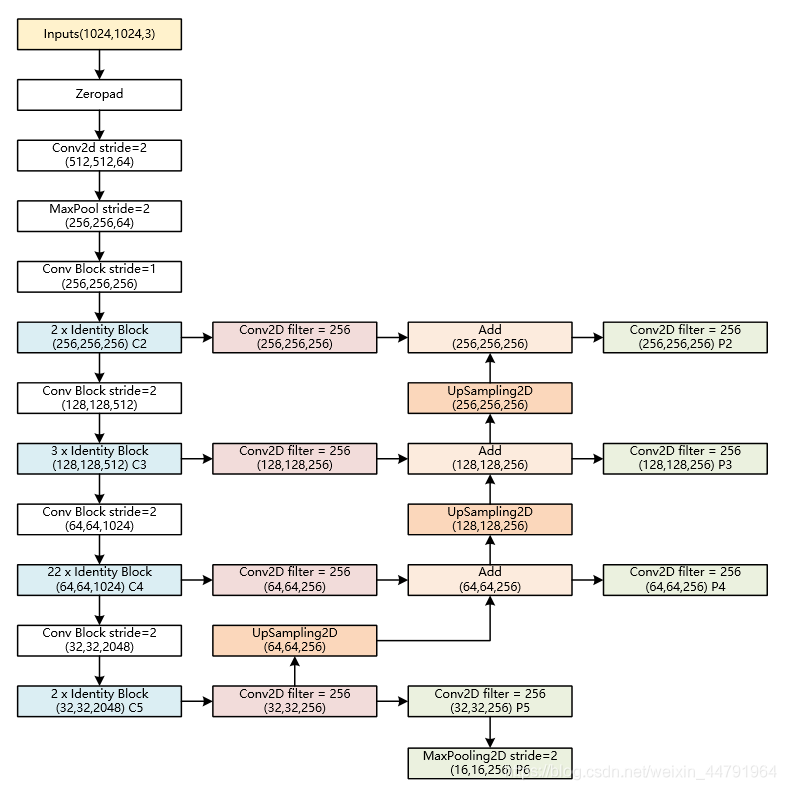
Mask-RCNN使用Resnet101作为主干特征提取网络,对应着图像中的CNN部分,其对输入进来的图片有尺寸要求,需要可以整除2的6次方。在进行特征提取后,利用长宽压缩了两次、三次、四次、五次的特征层来进行特征金字塔结构的构造。
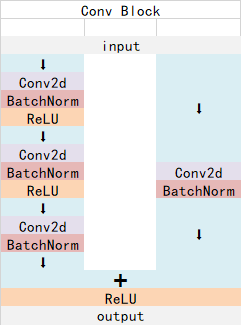
ResNet101有两个基本的块,分别名为Conv Block和Identity Block,其中Conv Block输入和输出的维度是不一样的,所以不能连续串联,它的作用是改变网络的维度;Identity Block输入维度和输出维度相同,可以串联,用于加深网络的。
Conv Block的结构如下:
Identity Block的结构如下:
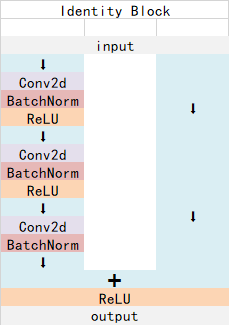
这两个都是残差网络结构。
以官方使用的coco数据集输入的shape为例,输入的shape为1024x1024,shape变化如下:
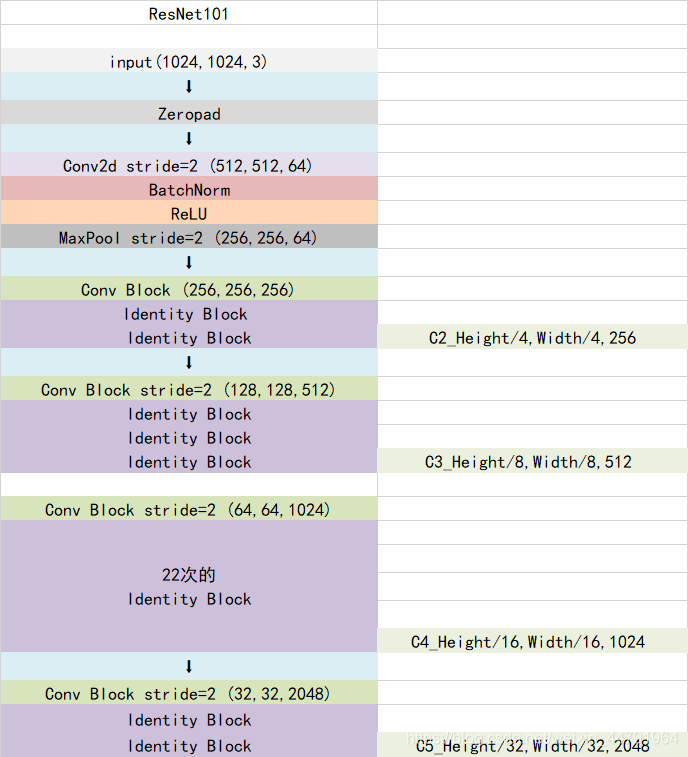
我们取出长宽压缩了两次、三次、四次、五次的结果来进行特征金字塔结构的构造。
实现代码:
from keras.layers import ZeroPadding2D,Conv2D,MaxPooling2D,BatchNormalization,Activation,Add def identity_block(input_tensor, kernel_size, filters, stage, block, use_bias=True, train_bn=True): nb_filter1, nb_filter2, nb_filter3 = filters conv_name_base = 'res' + str(stage) + block + '_branch' bn_name_base = 'bn' + str(stage) + block + '_branch' x = Conv2D(nb_filter1, (1, 1), name=conv_name_base + '2a', use_bias=use_bias)(input_tensor) x = BatchNormalization(name=bn_name_base + '2a')(x, training=train_bn) x = Activation('relu')(x) x = Conv2D(nb_filter2, (kernel_size, kernel_size), padding='same', name=conv_name_base + '2b', use_bias=use_bias)(x) x = BatchNormalization(name=bn_name_base + '2b')(x, training=train_bn) x = Activation('relu')(x) x = Conv2D(nb_filter3, (1, 1), name=conv_name_base + '2c', use_bias=use_bias)(x) x = BatchNormalization(name=bn_name_base + '2c')(x, training=train_bn) x = Add()([x, input_tensor]) x = Activation('relu', name='res' + str(stage) + block + '_out')(x) return x def conv_block(input_tensor, kernel_size, filters, stage, block, strides=(2, 2), use_bias=True, train_bn=True): nb_filter1, nb_filter2, nb_filter3 = filters conv_name_base = 'res' + str(stage) + block + '_branch' bn_name_base = 'bn' + str(stage) + block + '_branch' x = Conv2D(nb_filter1, (1, 1), strides=strides, name=conv_name_base + '2a', use_bias=use_bias)(input_tensor) x = BatchNormalization(name=bn_name_base + '2a')(x, training=train_bn) x = Activation('relu')(x) x = Conv2D(nb_filter2, (kernel_size, kernel_size), padding='same', name=conv_name_base + '2b', use_bias=use_bias)(x) x = BatchNormalization(name=bn_name_base + '2b')(x, training=train_bn) x = Activation('relu')(x) x = Conv2D(nb_filter3, (1, 1), name=conv_name_base + '2c', use_bias=use_bias)(x) x = BatchNormalization(name=bn_name_base + '2c')(x, training=train_bn) shortcut = Conv2D(nb_filter3, (1, 1), strides=strides, name=conv_name_base + '1', use_bias=use_bias)(input_tensor) shortcut = BatchNormalization(name=bn_name_base + '1')(shortcut, training=train_bn) x = Add()([x, shortcut]) x = Activation('relu', name='res' + str(stage) + block + '_out')(x) return x def get_resnet(input_image,stage5=False, train_bn=True): # Stage 1 x = ZeroPadding2D((3, 3))(input_image) x = Conv2D(64, (7, 7), strides=(2, 2), name='conv1', use_bias=True)(x) x = BatchNormalization(name='bn_conv1')(x, training=train_bn) x = Activation('relu')(x) # Height/4,Width/4,64 C1 = x = MaxPooling2D((3, 3), strides=(2, 2), padding="same")(x) # Stage 2 x = conv_block(x, 3, [64, 64, 256], stage=2, block='a', strides=(1, 1), train_bn=train_bn) x = identity_block(x, 3, [64, 64, 256], stage=2, block='b', train_bn=train_bn) # Height/4,Width/4,256 C2 = x = identity_block(x, 3, [64, 64, 256], stage=2, block='c', train_bn=train_bn) # Stage 3 x = conv_block(x, 3, [128, 128, 512], stage=3, block='a', train_bn=train_bn) x = identity_block(x, 3, [128, 128, 512], stage=3, block='b', train_bn=train_bn) x = identity_block(x, 3, [128, 128, 512], stage=3, block='c', train_bn=train_bn) # Height/8,Width/8,512 C3 = x = identity_block(x, 3, [128, 128, 512], stage=3, block='d', train_bn=train_bn) # Stage 4 x = conv_block(x, 3, [256, 256, 1024], stage=4, block='a', train_bn=train_bn) block_count = 22 for i in range(block_count): x = identity_block(x, 3, [256, 256, 1024], stage=4, block=chr(98 + i), train_bn=train_bn) # Height/16,Width/16,1024 C4 = x # Stage 5 if stage5: x = conv_block(x, 3, [512, 512, 2048], stage=5, block='a', train_bn=train_bn) x = identity_block(x, 3, [512, 512, 2048], stage=5, block='b', train_bn=train_bn) # Height/32,Width/32,2048 C5 = x = identity_block(x, 3, [512, 512, 2048], stage=5, block='c', train_bn=train_bn) else: C5 = None return [C1, C2, C3, C4, C5] 2、特征金字塔FPN的构建
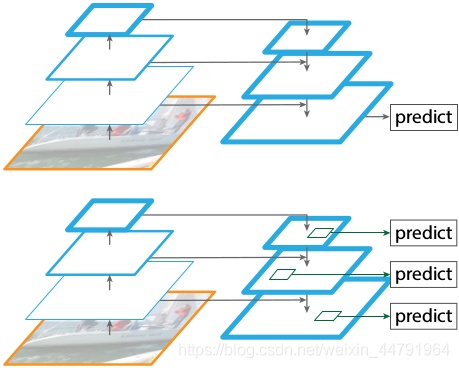
特征金字塔FPN的构建是为了实现特征多尺度的融合,在Mask R-CNN当中,我们取出在主干特征提取网络中长宽压缩了两次C2、三次C3、四次C4、五次C5的结果来进行特征金字塔结构的构造。
提取到的P2、P3、P4、P5、P6可以作为RPN网络的有效特征层,利用RPN建议框网络对有效特征层进行下一步的操作,对先验框进行解码获得建议框。
提取到的P2、P3、P4、P5可以作为Classifier和Mask网络的有效特征层,利用Classifier预测框网络对有效特征层进行下一步的操作,对建议框解码获得最终预测框;利用Mask语义分割网络对有效特征层进行下一步的操作,获得每一个预测框内部的语义分割结果。
实现代码如下:
# 获得Resnet里的压缩程度不同的一些层 _, C2, C3, C4, C5 = get_resnet(input_image, stage5=True, train_bn=config.TRAIN_BN) # 组合成特征金字塔的结构 # P5长宽共压缩了5次 # Height/32,Width/32,256 P5 = Conv2D(config.TOP_DOWN_PYRAMID_SIZE, (1, 1), name='fpn_c5p5')(C5) # P4长宽共压缩了4次 # Height/16,Width/16,256 P4 = Add(name="fpn_p4add")([ UpSampling2D(size=(2, 2), name="fpn_p5upsampled")(P5), Conv2D(config.TOP_DOWN_PYRAMID_SIZE, (1, 1), name='fpn_c4p4')(C4)]) # P4长宽共压缩了3次 # Height/8,Width/8,256 P3 = Add(name="fpn_p3add")([ UpSampling2D(size=(2, 2), name="fpn_p4upsampled")(P4), Conv2D(config.TOP_DOWN_PYRAMID_SIZE, (1, 1), name='fpn_c3p3')(C3)]) # P4长宽共压缩了2次 # Height/4,Width/4,256 P2 = Add(name="fpn_p2add")([ UpSampling2D(size=(2, 2), name="fpn_p3upsampled")(P3), Conv2D(config.TOP_DOWN_PYRAMID_SIZE, (1, 1), name='fpn_c2p2')(C2)]) # 各自进行一次256通道的卷积,此时P2、P3、P4、P5通道数相同 # Height/4,Width/4,256 P2 = Conv2D(config.TOP_DOWN_PYRAMID_SIZE, (3, 3), padding="SAME", name="fpn_p2")(P2) # Height/8,Width/8,256 P3 = Conv2D(config.TOP_DOWN_PYRAMID_SIZE, (3, 3), padding="SAME", name="fpn_p3")(P3) # Height/16,Width/16,256 P4 = Conv2D(config.TOP_DOWN_PYRAMID_SIZE, (3, 3), padding="SAME", name="fpn_p4")(P4) # Height/32,Width/32,256 P5 = Conv2D(config.TOP_DOWN_PYRAMID_SIZE, (3, 3), padding="SAME", name="fpn_p5")(P5) # 在建议框网络里面还有一个P6用于获取建议框 # Height/64,Width/64,256 P6 = MaxPooling2D(pool_size=(1, 1), strides=2, name="fpn_p6")(P5) # P2, P3, P4, P5, P6可以用于获取建议框 rpn_feature_maps = [P2, P3, P4, P5, P6] # P2, P3, P4, P5用于获取mask信息 mrcnn_feature_maps = [P2, P3, P4, P5]
3、获得Proposal建议框
由上一步获得的有效特征层在图像中就是Feature Map,其有两个应用,一个是和ROIAsign结合使用、另一个是进入到Region Proposal Network进行建议框的获取。
在进行建议框获取的时候,我们使用的有效特征层是P2、P3、P4、P5、P6,它们使用同一个RPN建议框网络获取先验框调整参数,还有先验框内部是否包含物体。
在Mask R-cnn中,RPN建议框网络的结构和Faster RCNN中的RPN建议框网络类似。
首先进行一次3x3的通道数为512的卷积。
然后再分别进行一次anchors_per_location x 4的卷积 和一次anchors_per_location x 2的卷积。
anchors_per_location x 4的卷积 用于预测 公用特征层上 每一个网格点上 每一个先验框的变化情况。(为什么说是变化情况呢,这是因为Faster-RCNN的预测结果需要结合先验框获得预测框,预测结果就是先验框的变化情况。)
anchors_per_location x 2的卷积 用于预测 公用特征层上 每一个网格点上 每一个预测框内部是否包含了物体。
当我们输入的图片的shape是1024x1024x3的时候,公用特征层的shape就是256x256x256、128x128x256、64x64x256、32x32x256、16x16x256,相当于把输入进来的图像分割成不同大小的网格,然后每个网格默认存在3(anchors_per_location )个先验框,这些先验框有不同的大小,在图像上密密麻麻。
anchors_per_location x 4的卷积的结果会对这些先验框进行调整,获得一个新的框。anchors_per_location x 2的卷积会判断上述获得的新框是否包含物体。
到这里我们可以获得了一些有用的框,这些框会利用anchors_per_location x 2的卷积判断是否存在物体。
到此位置还只是粗略的一个框的获取,也就是一个建议框。然后我们会在建议框里面继续找东西。
实现代码为:
#------------------------------------# # 五个不同大小的特征层会传入到
相关内容
- Keras目标检测mtcnn facenet搭建人脸识别平台_python_
- Python+radar实现随机日期时间的生成_python_
- python量化之搭建Transformer模型用于股票价格预测_python_
- 使用Python读写多个sheet文件_python_
- 如何使用Python 绘制瀑布图_python_
- 使用Python绘制空气质量日历图_python_
- Python tuple方法和string常量介绍_python_
- 利用Python绘制多种风玫瑰图_python_
- 利用Python写了一个水果忍者小游戏_python_
- Python基础知识方法重写+文件处理+异常处理_python_
点击排行
本栏推荐